“The virtues of donations are great, because it helps the needy and at the same time it gives an opportunity to the donor to give the surplus to the people in need ” - Sama Veda

Search This Blog

Showing posts with label North indian. Show all posts

Sunday, April 30, 2023

Buckwheat pasta recipe

Buckwheat-recipe-for-vrat, Ekadashi-recipe, Ekadashi -pasta

Buckwheat is a seed which is gluten free and rich in heart-healthy nutrients. It lowers cholestrol and helps in managing diabetes. Buckwheat is a good source of protein, fiber, magnesium and improves heart health. It also has a good source of plant compounds.

Video: 👇👇


Buckwheat is commonly used in North India on Ekadasi and Vrat days, as it is not a grain and thus approved for days when you are fasting from grains. Buckwheat flour is popularly known as 'Kuttu ka Atta' in North India. However, Ekadasi/Vrat protocols are different in South India.

Ingredients: 

Buckwheat pasta - 2 cups
Tricoloured bell peppers and Broccoli - 2 cups
No rennett parmesan cheese - 1/4 cup
Blanched tomato puree - 1 cup
Oil - 1 tsp.
Butter - 2 tablespoon
Milk - as needed
Salt - to taste
Black pepper powder - 1/2 tsp
Oregano - 1 tsp.
Dried basil - 1 tsp.

Method:

Boil water. Add pasta, salt, oil. 
Cook al dente or follow instructions in pack. Drain.

Heat pan, add butter. When butter melts, add veggies, salt, tomato puree, stir. Add milk as needed. Mix, allow to boil.

Add cooked buckwheat pasta. Mix gently, add black pepper powder , oregano and dried basil. Add milk to get desired consistency. Cook in low flame for 3-4 minutes. 

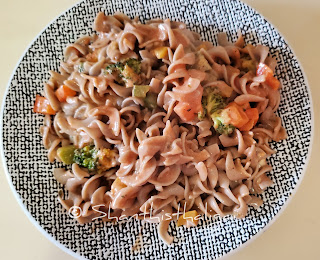
Yummy buckwheat pasta is ready. Offer to Krishna 🙏🙏. Serve hot.

Friday, June 5, 2020

KATHAL BIRYANI RECIPE / RAW JACKFRUIT BIRYANI RECIPE

Kathal pulao, Raw jackfruit pulao, Palakkai pulao
INGREDIENTS:
  • Basmati rice - 1 cup
  • Chopped raw jackfruit (kathal) - 2 cups
  • Cloves - 3
  • Cardamom - 2
  • Cinnamon - 2 sticks
  • Bay leaf - 2
  • Star anise - 1
  • Stone flower - a pinch
  • Mint leaves - ½ cup
  • Grated ginger - 1 tsp
  • Salt - to taste
  • Coriander leaves - to garnish
  • Ghee - 1 tsp.
  • Oil - 2 tablespoons
  • Saffron - few strands 
  • Warm milk - 1 tsp.
To marinate:
  • Amchur powder - ¼ tsp.
  • Garam masala powder - 1 tsp.
  • Coriander powder - 1 tsp.
  • Cumin powder - ¼ tsp.
  • Turmeric powder - ¼ tsp.
  • Chilli powder - ¾ tsp.
  • Curd - 3 tablespoons
  • Salt - a generous pinch
Kathal pulao, Raw jackfruit pulao, Palakkai pulao


METHOD:
  • Wash and soak basmati rice for ½ an hour. Grate ginger. Soak saffron in a spoon of warm milk. Keep aside.
  • Clean, wash and chop raw jackfruit (kathal) to big chunks. Marinate with the given ingredients for 10 minutes.
  • In a pressure pan, heat oil and ghee, add the whole spices, mint leaves, grated ginger, saute for a minute. Add marinated raw jackfruit (kathal). Stir for a minute. Drain rice and add to it. Mix well.  Add salt as needed. Pressure cook for 3 whistles.When pressure has subsided, add soaked saffron, mix gently.
  • Garnish with coriander leaves.  Serve hot with raitha or chips of your choice.

Thursday, October 12, 2017

KURKURI BHINDI RECIPE / AIR FRIED CRISPY OKRA RECIPE / AIR FRIED KURKURI BHINDI RECIPE

How-to-make-crispy-okra,How-to-make-kurkuri-bhindi
Kurkuri bhindi is a perfect tea-time snack which is made with ladysfinger/okra. 'Kurkuri' is 'crisp' in Hindi. 

Recently I received a request to review Philips Air fryer. I accepted the opportunity as I can try out recipes with new products and give my honest opinion about the performance of the product.  

Philips has introduced their Viva Collection Air fryers. The product which I received was Turbostar which cooks with rapid air technology. Philips claims tasty frying with 80% less oil. The product comes with a basket with an easy click handle, metal mesh and a recipe book.  Some accessories like grill pan, rack and baking pan can be purchased from their store.

I personally feel that Airfryer is a good option for low fat cooking and can be a healthy start. Cooking in Airfryer is an alternative to deep frying as we can use little or no oil. Health conscious people can prefer air-frying instead of deep frying.

Whenever I buy a new gadget/appliance, I think twice and ask myself, whether it is worth to get it? As regards Air fryer, I always had the doubt if it actually fries in air? Now, having used it, I can say it is nothing but a small oven. Unlike the convection oven, we can make only small quantities. You can fry, bake, grill and roast in Philips Air fryer. Philips Air fryer is small but heavy. So, keeping it on counter-top would be safe.  Easy to clean. As I cook only vegetarian, there is no unpleasant odour while cooking.

Disclaimer:  This review is done on request from Philips. The opinions are based on my personal experiences. Use your own discretion before buying the product.

What all can be made?

I have been using this for sometime now and tried some recipes. Masal/paruppu vadai, Kaarakari, chips, roasts, cutlets, baked samosas, biscuits/cookies, muffins, buns, bread etc. can be made. However, when I asked the demo person, about making poori and  poricha appalam, he said poricha appalam can't be made as sit is very light and will be blown away by air. So, I did not take the risk of trying it. We can't make poori also. DO NOT TRY appalam or pappadam by brushing oil, as it is very light and will get blown away by the air. Click here for Ragi biscuits/Ragi cookies in Philips Airfryer.

Now I am sharing an easy to make Air-fried Kurkuri Bhindi.

Kurkuri bhindi is a perfect tea-time snack which is made with ladysfinger/okra. 'Kurkuri' is 'crisp' in Hindi. Usually, this is deep fried. As a healthier option, I made the bhindis in Philips Airfryer. I was able to break the bhindis and felt the crunchiness while eating. The pictures are pretty much self-explanatory. Anyway, the recipe also follows is how I made it in an Airfryer. 

INGREDIENTS:

Okra / Ladysfinger - 1/4 kg.
Besan/gramflour - 2 tablespoons
Rice flour - 2 tablespoons
Turmeric powder - 1/8 tsp.
Red chilli powder + Sambar powder - 1/2 tsp. + 1/2 tsp.
Black pepper powder - 1/4 tsp.
Cumin powder - 1/4 tsp.
Coriander powder - 2 tsp.
Garam masala - 1/2 tsp. 
Amchur - 1 tsp.
Oil - 2 tablespoons

Garnishing:
Chat masala - to sprinkle
A dash of lemon juice

METHOD:

Wash and pat dry okra. Remove both the ends and slit vertically to four pieces. Mix all dry ingredients well. Sprinkle this over the slit bhindis so that it is fully coated and well blended. Add oil and mix again with your hand.
How-to-make-crispy-okra,How-to-make-kurkuri-bhindi
Preheat air fryer at 180°C for 5 minutes. Transfer the coated bhindis to the mesh and air fry for 15 minutes at 180°C. Take out the basket and toss in between. If necessary air fry / bake for a couple of minutes more until crispy. 
How-to-make-crispy-okra,How-to-make-kurkuri-bhindi
Yummy Kurkuri Bhindi / Airfried Kurkuri Bhindi is ready. Serve hot by sprinkling chat masala on top with a dash of lemon juice. Goes well with Rice and dal. A perfect snack with tea/coffee.

NOTE:
Be careful and keep an eye after 12 minutes.
Any masala powders can be added/substituted according to your tastebuds. 
Kurkuri bhindi can also be deep fried in oil. It can also be shallow fried.


Thursday, August 24, 2017

BROCCOLI PARATHA RECIPE / PREETHI ZODIAC REVIEW

Recently I received a request from Preethi Kitchen appliances to review their product Preethi Zodiac Food Processor. I received the product from them and after using it for quite sometime, I am sharing my experiences and personally feel that Preethi Zodiac Food Processor is a good companion in kitchen. 

Preethi Kitchen appliances,the iconic brand, have recently launched their food processor appliance named PREETHI ZODIAC MIXER GRINDER.

Mixie/grinder has become inevitable in any Indian household. So, what’s the difference between mixie/blender and a food processor? Mixies/blenders are used for making purees, smoothies, grinding etc., whereas food processors excel at grating, shredding, chopping, kneading, mincing, pureeing, grinding, herbs chopping and so on.

The Master Chef Jar is very attractive. The atta kneader attachment kneads even stiff dough within a minute as the product has a heavy duty motor. As it is kneading in high speed, the rotis also turn out to be soft. The dough is just like traditionally kneaded dough. With the right attachment, it chops, shreds, grates and slices paneer, cheese, vegetables and fruits quickly and easily. I was surprised to see everything done in just few seconds, you can say it as a record time. The wide mouth design of the master chef jar enables to hold more quantity and makes cleaning process also very easy. An added feature is the citrus juicer. It fits in the master chef jar.

Note: Blend in batches if you have to do in large quantities.

High speed juice extractor: This extracts juice from fruits and vegetables with ease. You can make preservative free juice at home. Now, with this facility, you can say a big NO to storebought juices, which have preservatives. Coconut milk extract is done in minutes. Centrifugal Juicer ensures instant juicing with more juice extraction

Wet/dry/chutney jars: It grinds really fast and smooth. I ground half kg. soaked millets and rice in less than 2 minutes, similarly the powders.

Build: Very sturdy. So no jerk / vibration. 


I can say it as a multitasker and a stylish addition to home. It is easy to use, assemble and clean. I would recommend Preethi Zodiac as an essential home appliance and a must in any kitchen which makes kitchen work simpler.

Features:
750W Motor - Superior performance, 5 year motor warranty; 2 year product guarantee.
3 in 1 Insta-Fresh Juicer - centrifugal juicing, blending and extraction
2.1 Ltr. Master Chef Jar - atta kneading, citrus juicer, grating, slicing, chopping
1 wet grinding jar, 1 dry grinding jar, 1 chutney jar
Lifelong Free Service.

Occupies more storage space but worth it. There could have been one coconut scraper attachment and vegetable dicer attachment too. For more details visit http://www.preethi.in/


Disclaimer: This review is done on request from Preethi Kitchen appliances. This review is my personal experience. Use your own discretion before buying the product. 


HOW I MADE BROCCOLI PARATHA IN LESS THAN 10 minutes with Preethi Zodiac Food Processor?  

I grated paneer in 10 seconds, broccoli in 15 secondssliced carrots in 5 seconds, shredded red cabbage in 5 seconds. I smeared oil on the inner surface of the mixer and blades. Added the flour and salt. Switched to 1st speed, added water little by little until the flour came together. Did not add water after that.  Pulsed 4 to 5 times to finish the kneading and switched off. This was done in a minute. You get a non-sticky dough and soft rotis like the traditionally made ones. All this work was done by Preethi Zodiac Food Processor in less than 3 minutes.


NOW TO THE RECIPE:

INGREDIENTS:
Whole wheat atta - 2 cups
Salt - to taste 
Ghee - for spreading 
Butter - for topping

FOR STUFFING:
Paneer - 100 gms
Broccoli - 1/2 kg.
Potato - 2 (medium sized)
Chilli powder- 1/4 tsp.
Garam masala - 1 tsp.
Green chillies - 2
Coriander leaves - few
Omam(Ajwain) - 1/2 tsp.
Salt - to taste 

METHOD:
(I have pressed the dough to show how soft and non-sticky it is)

Knead atta with salt and little water to a medium soft dough. Keep aside. 

Wash paneer well, grate it, and squeeze out the water completely using your hand. Wash broccoli and grate it. Boil potatoes, peel the skin and mash it well without any lumps. Grind coriander leaves and green chillies coarsely without adding water. Mix all ingredients alongwith ajwain(omam), chilli powder, garam masala and salt. Your stuffing is ready now.

Take medium -sized balls from the dough, shape it to a cup and fill it with stuffing and close it from the sides. OR you can also roll the dough to small puris, fill the stuffing in the centre and close it from the sides.

Dust the balls with wheat flour, and roll it out gently.

Heat a tawa, place the rolled paratha, allow to cook on one side, and when the colour changes, flip it to the other side. Spread some ghee on each side, flip and cook till done.

Serve hot with curd topped with chaat masala, roasted jeera powder and chilli powder OR tomato sauce OR tomato ketchup OR pickle OR any side dish of your choice.

Monday, July 31, 2017

MIXED VEGETABLE SABJI / MIXED VEGETABLE BHAJI / MIXED VEGETABLE SABJI RECIPE / MIXED VEGETABLE BHAJI RECIPE


There are so many variations in making mixed vegetable sabji /bhaji. This is a simple home style North Indian dry curry. There is no hard and fast rules for the vegetable varieties. Any veggies which suits your taste, and availability can be used.  This is a no onion no garlic dry curry. Onions can also be aded.

INGREDIENTS:

Mixed vegetables - 3 cups
(I used cauliflower, capsicum and shelled peas)
Tomato -1
Cumin seeds - 1/2 tsp.
Bay leaves - 1
Turmeric powder - 1/4 tsp.
Grated ginger- 1/4 tsp
Green chilly - 1 (finely chopped)
Kashmiri chilli powder - 1/4 tsp.
Black pepper powder- 1/4 tsp.
Dhania powder - 1 tablespoon
Garam masala - 1 tsp.
Amchur - 1/2 tsp.
Hing - a pinch
Oil - 1 tablespoon
Salt - to taste
Chopped coriander leaves - 1 tablespoon

METHOD:

Cut cauliflower into florets, wash well and soak in water along with salt for 15 minutes. After de-worming wash the florets again. Half boil the florets along-with salt. Drain and keep aside. Chop tomatoes roughly and dice capsicum.

Heat oil in a wok, temper with cumin seeds, bay leaves, hing and turmeric powder. Add finely chopped green chilli, grated ginger, capsicum and tomatoes. Saute on high flame 
for a couple of minutes. Add shelled peas, half boiled cauliflower, chilli powder, dhania powder, salt. Sprinkle water and cook covered in medium heat until done. Take off the lid and add black pepper powder, garam masala and amchur powder. Mix gently and saute for a couple of minutes. Turn off the heat. Add finely chopped coriander leaves. Serve hot with phulkas, pooris, rotis and theplas. Can also be had as a side dish for south-indian meals.

Thursday, April 20, 2017

KADAI VEGETABLE / MIXED VEGETABLE KADAI CURRY / PUNJABI KADAI VEGETABLE

Mixed vegetable kadai curry, How to make kadai vegetable without onion and garlic,

Kadai Vegetable is a combination mixed vegetables cooked with freshly ground spices which gives a nice aroma to the recipe. This is a perfect side dish for roti, naan and pulao. 

Recently, my sister made this 👆👆(Pic courtesy : My sister) and got appreciations from the family. As I do not eat onions, I just clicked the picture. 

My version of 'Kadai vegetable' 👇👇. Here's the recipe of 'Veg Kadai' sans onion and garlic. No onion no garlic? 😮 So what? Do try it 😊

INGREDIENTS:

Cubed mixed vegetables - 2 cups
(Cauliflower, french beans, carrot, capsicum, fresh green peas)
Paneer (cubed) - 1/2 cup
Tomatoes  - 2
Green chilli - 2 
Ginger - 1" piece
Turmeric powder - 1/4 tsp.
Coriander powder - 1 tablespoon
Chilli powder - 1/2 tsp.
Cumin powder - 1/4 tsp.
Punjabi garam masala - 1 tsp.
Crushed kasuri methi - 1/2 tsp.
Salt - to taste
Oil - 3 tablespoons
Butter - 1 tablespoon
Finely chopped coriander leaves - 2 tablespoons

Kadai masala:
Coriander seeds - 1 tablespoon
Dried red chillies - 2
Cloves - 2
Cardamom - 1

METHOD:

Cut capsicum and tomato into cubes, separate cauliflower into florets, cut beans and carrrot to finger long pieces. Cube paneer and immerse in hot water until use.

Dry roast and coarsely powder the items given in 'Kadai masala'. Grind ginger and green chillies coarsely without adding water. 

Heat  a teaspoon of oil in a kadai, sauté capsicum with a pinch of salt in high flame for 2 minutes, remove from pan and keep aside. (If you use onions, you can add 1 sliced onion alongwith capsicum).

Heat butter and oil in the same kadai, and add ginger-green chilli paste, and sauté until raw smell diffuses, add veggies and saute in medium heat. Add salt, turmeric, coriander, cumin and red chilli powder. Cook covered until half done. Sprinkle little water if necessary. Add cubed tomatoes and 'kadai masala', mix well and cook covered until done. Now add already sauteed capsicum, cubed paneer, punjabi garam masala, mix well. Cover the pan and cook for 2 more minutes. Add kasuri methi, chopped coriander leaves, mix and serve hot with any Indian flat bread or pulao. 

NOTE: You can add more of any spices to suit your tastebuds.  

Friday, August 26, 2016

RASEDAR ALOO TAMATAR / RASEDAR ALOO (NO ONION NO GARLIC)


'Rasedar' means a juicy, thinner consistency of a gravy / subzi.  'Rasedar aloo tamatar' / 'Rasedar aloo', is a famous dish all over North India, the making differs in all cities though. When we went to 'Puri', I had this as a side dish for bhatura. Though I have tasted this in many cities, I would say the one which we get in "Puri, Orissa" is the best. It is an easy to make, simple gravy with potatoes and tomatoes, with flavourful, basic spices and without onion and garlic. Its a 'farali' gravy/subzi. ('farali' means food suitable for fasting).

INGREDIENTS:

Potatoes - 4 (medium-sized)
Tomatoes - 2
Green chilli - 1 or 2
Cumin seeds -1/2 tsp.
Turmeric powder - 1/4 tsp.
Red chilli powder - 1/2 tsp.
Amchoor powder - a generous pinch

Garam masala - 1/2 tsp.
Hing - a generous pinch
Finely chopped coriander leaves - few
Salt - to taste
Oil - 2 tablespoons

METHOD:

Wash, peel and cut potatoes to cubes. Slit green chillies. Puree one tomato. Finely chop the other tomato. 

Heat oil in a pressure pan, add slit green chillies and cumin seeds. When cumin seeds crackle, add pureed tomato, chopped tomato, turmeric powder, chilli powder and hing. Mix well and saute for 3-4 minutes in medium flame. Now, add cubed potatoes, salt and a cup of water. Pressure cook for 2 whistles. When cool, open the lid, add water if necessary to get the thinner consistency (rasa). Add garam masala, mix well and cook in low flame for a minute. Switch off the stove, add amchoor powder and garnish with coriander leaves. Serve hot with rice or pulao, but it pairs best with poori.

Saturday, June 25, 2016

BAGHARA BAINGAN / HYDERABADI BAGHARA BAINGAN / BAGARA BAINGAN (NO ONION NO GARLIC)

BAGHARA BAINGAN, HYDERABADI BAGHARA BAINGAN, BAGARA BAINGAN (NO ONION NO GARLIC)

Brinjal / Eggplant is a versatile vegetable used in all the cuisines worldwide. Bagara baingan is a popular Indian cuisine with eggplant/brinjal. Hyderabadi Baghara baingan was developed in Medieval India during the Mughal Empire with some ingredients like shahjeera, kalonji and cashews to make the dish rich and flavourful. 'Baghaar' means tempering. Tempering is a cooking technique in which spices are fried in oil or ghee to enhance the flavours, done at the beginning of cooking a dish, or added to a dish at the end of cooking. So you can name it as 'Bagara baingan' or say it as 'Hyderabadi Bhagara baingan' according to the ingredients used for the 'Baghaar'. I cooked it the 'NO ONION NO GARLIC' way. Keep an eye on the notes if using onions and garlic.

INGREDIENTS:

Small brinjals - 12
Tamarind - a keylime size OR Tamarind paste - 1.5 tablespoons
Ginger paste - 1 tsp.
Turmeric powder - 1/4 tsp.
Chilli powder - 1/2 tsp.
Grated jaggery - 1 tsp.
Hing - a generous pinch
Finely chopped coriander leaves - few
Oil - 4 tablespoons
Ghee - 1 teaspoon
Salt - to taste

To temper:
Mustard seeds -1/4 tsp.
Cumin seeds - 1/4 tsp.
Curry leaves - 2 sprigs

To dry roast and grind to a paste:
Coriander seeds - 3 tablespoons
Dry red chillies - 3
Peanuts(deskinned) - 2 tablespoons
White sesame - 1 tablespoon
Poppy seeds - 1/2 tsp.

Fenugreek seeds - 1/2 tsp.
Dry coconut (kopparai) or dessicated coconut - 3 tablespoons
Cinnamon - 1" stick (optional)
Shahjeera - 1 tsp.
Kalonji - 1/2 tsp.
Cashews - 4


METHOD:

Soak tamarind in a cup of warm water, extract juice, strain and keep aside.

(NOTE: If using onions, fry onions in a spoon of oil, add a pinch of salt and saute until it becomes translucent. When cool grind it to a paste and keep aside.)

Dry roast the ingredients given in 'To dry roast and grind to a paste' separately one by one and when cool grind to a paste. NOTE: Kalonji and Shahjeera can be used in tempering as well. If using for tempering, skip it here.

Slit brinjals criss-cross with stem intact, rub little salt and stuff a spoon of the above ground paste and keep ready. Reserve the remaining paste.

Heat 2 tablespoons of oil, add the slit and stuffed brinjals with little turmeric powder and little salt and fry until the brinjals change its colour. Cook it covered in low flame for 3 minutes. Turn it to all sides in between. Remove the brinjals carefully, without breaking and keep aside.

In the same pan, heat the remaining oil and ghee, temper with the given ingredients, and add the ginger paste. (NOTE: To those who use onion/garlic, add onion paste and ginger-garlic paste now and saute well). Add tamarind extract, chilli powder, salt, jaggery, hing and allow it to boil until the raw smell is diffused. Now add the ground paste and cook for 5 minutes in medium flame until it thickens. Stir frequently. Now add the shallow-fried brinjals, simmer the stove and cook until oil leaves the sides and everything is mixed well. You can add water to get the desired consistency. Garnish with coriander leaves. Serve hot with rice topped with ghee, roti or jeera pulao.

Tuesday, May 31, 2016

TRI-COLOUR STUFFED BELL PEPPERS / BHARWAN SHIMLA MIRCH / STUFFED SHIMLA MIRCH / STUFFED BELL PEPPERS

TRI-COLOUR STUFFED BELL PEPPERS, BHARWAN SHIMLA MIRCH,STUFFED SHIMLA MIRCH, HOW TO MAKE STUFFED BELL PEPPERS

TRI-COLOUR STUFFED BELL PEPPERS, BHARWAN SHIMLA MIRCH,STUFFED SHIMLA MIRCH, HOW TO MAKE STUFFED BELL PEPPERS

Stuffed bellpeppers / Bharwan shimla mirch is a unique, tasty side dish. I have stuffed the bell peppers with potato filling. The choice of filling  can be made according to your interest and creativity and can be made with spiced up paneer, veggies, quinoa, rice, etc. and you can also top up with cheese if you bake. You can also bake, steam or deep fry in oil. The quantity of the filling depends  upon the size of the capsicum. My bell peppers were medium in size.  I toasted it on stovetop in a pan. The measurements given are for 6 medium-sized bell peppers. 

INGREDIENTS:

Bell peppers / Capsicum / Simla mirch - 6
Melted butter - 2 tablespoons
Salt - little ( to spread evenly on the bell peppers)

For stuffing:

Potatoes - 4 or 5
Shelled peas or frozen peas -fistful
Cumin seeds - 1/2 tsp.
Onion - 1 (optional,I didn't use)
Green chilli - 1 or 2 (finely chopped)
Grated ginger - 1/4 tsp.
Amchur powder - 1/4 tsp
Garam masala - 1/2 tsp.
Chilli powder - 1/4 tsp.
Turmeric powder - a generous pinch
Finely chopped coriander leaves - 2 tablespoons
Oil - 2 tsp.
Salt - to taste

TRI-COLOUR STUFFED BELL PEPPERS, BHARWAN SHIMLA MIRCH,STUFFED SHIMLA MIRCH, HOW TO MAKE STUFFED BELL PEPPERS

METHOD:

Boil, peel and cook potatoes, mash well. Heat oil in a pan, add cumin seeds, grated ginger, green chillies,(add onions now if using), peas and saute for a while. Add potatoes, salt and all other ingredients given for stuffing, mix well. Switch off the stove. Add coriander leaves, mix well and allow it to cool a bit.

Meanwhile, wash the bellpeppers, pat it dry. Cut the top portion of the bellpeppers, de-seed, spread little salt inside and outside of the capsicum and rest it for 5 minutes. Grease the capsicum with melted butter, heat the pan and cook on all sides until you see white spots. Take out and when cool, stuff the potato mixture. 

Again brush bell peppers with melted butter, heat the pan, arrange the stuffed bellpeppers, and cook in a low flame. Turn it on all sides with a tong until the bellpeppers change the colour and have light brown spots on it. Be careful not to burn it. If using a microwave oven, cook in micro-high for 5 minutes. Turn in-between. I would like to have this crunchy. You can also cook until it shrinks. Serve hot with rotis or with rice as a side dish.

Wednesday, April 13, 2016

KHANDVI

How to make Khandvi? Khandvi (Gujarati recipe)

Khandvi is an absolutely delicious, traditional savoury snack of Gujarat, made with gram flour and yoghurt and a perfect option for breakfast or evening snack. My daughter-in-law Shruthi, makes perfect, soft textured khandvi rolls. Making translucent and paper thin khandvi is truly an art, in which I should say she is an expert. Recently she made khandvi and sent this picture to me. The wonderful yellow colour caught my eyes and here is the recipe.

INGREDIENTS:

Gram flour (besan) - 1 cup
Fresh curd - 1 cup
Water - 1/2 cup
Ginger-green chilli paste - 1 tsp.
Turmeric powder - 1/4 tsp.
Hing - 1/4 tsp.
Salt - to taste
Lemon juice - 1/4 tsp.

To temper:
Oil - 3 tsp.
Mustard seeds - 1 tsp.
Finely chopped green chillies - 1/2 tsp.
Curry leaves - 1 sprig

To garnish:
Finely chopped coriander leaves - 2 tablespoons
Grated coconut - 2 tablespoons 

Gadgets:
A flat bottomed tray, spatula

METHOD:

Whisk curd and water. Combine besan with green chilli-ginger paste, turmeric powder, hing, salt and lemon juice. Add curd gradually and mix well without any lumps until smooth.

Grease the back side of the tray and the spatula with  1/2 a spoon of oil and keep it ready. 

Heat a pan, add the mixture and cook on a low flame for about 10 minutes. Stir continuously until it becomes thick and glossy. Switch off the stove. (NOTE: Once the batter is out of the stove, you have to spread the batter very fast while it is hot). Spread the mixture on the back of the greased tray while it is hot. Immediately level it with the spatula, as thinly as possible.

When cool, cut lengthwise into 1½-2" wide strips. Roll each strip gently to small cylinders. (You can either sprinkle grated coconut before rolling OR you can use grated coconut for garnishing)

Arrange the rolls in a serving tray, temper with the ingredients given in "to temper"and pour over the khandvi. Garnish with coriander leaves and coconut. Serve immediately with green chutney. 

Tuesday, October 13, 2015

ALOO PALAK /ALOO PALAK SABZI / VRAT KE ALOO PALAK

ALOO PALAK, HOW TO MAKE ALOO PALAK,ALOO PALAK SABZI, VRAT KE ALOO PALAK

This is a simple, yet healthy subji with 
sautéed spinach and potatoes.  There are two versions of this, dry curry and gravy. The punjabi version of this recipe has onion and ginger garlic paste. But my version is a NO ONION NO GARLIC RECIPE, yet tasty and aromatic. It is an easy subji which goes well with phulka, poori and rice. 

INGREDIENTS:


Potatoes - 4 medium - sized 
Palak / Spinach - 1 bunch
Cumin seeds - 3/4 tsp.
Turmeric powder - 1/4 tsp.
Chilli powder- 1/2 tsp.
Coriander powder - 1 tsp.
Ginger green chilli paste - 1 tsp.
Asafoetida - a pinch
Oil - 2 tablespoons
Salt - to taste

METHOD:

Boil, peel and cut potatoes. Wash palak and chop roughly.

Heat oil in a pan, add cumin seeds and when they sizzle add turmeric powder, ginger chilli paste, hing, chilli powder and coriander powder. Give a quick sauté and add the palak. When it wilts, add potato, salt and mix well. Cook covered for 5 minutes. Stir in between. Serve hot with poori, chappati or rice.

Friday, June 5, 2015

CHAPATHI / PHULKA

CHAPATHI, PHULKA, HOW TO MAKE PHULKA
CHAPATHI, PHULKA,HOW TO MAKE PHULKA

Chapathis are cooked on a tawa, whereas  phulka is partly cooked in tawa and  put on direct high flame. Many find it difficult to make and these simple steps can guide  you to make chapathis and phulkas.

INGREDIENTS:

Whole wheat atta- 4 cups
Salt- 1/2 tsp.
Water

METHOD:

For chapathis:

Take an easy to knead bowl, put in the atta and salt, add water little by little and mix it to a medium-soft dough. Knead well with your palm and fist it till soft. Keep aside for 20-30 minutes.

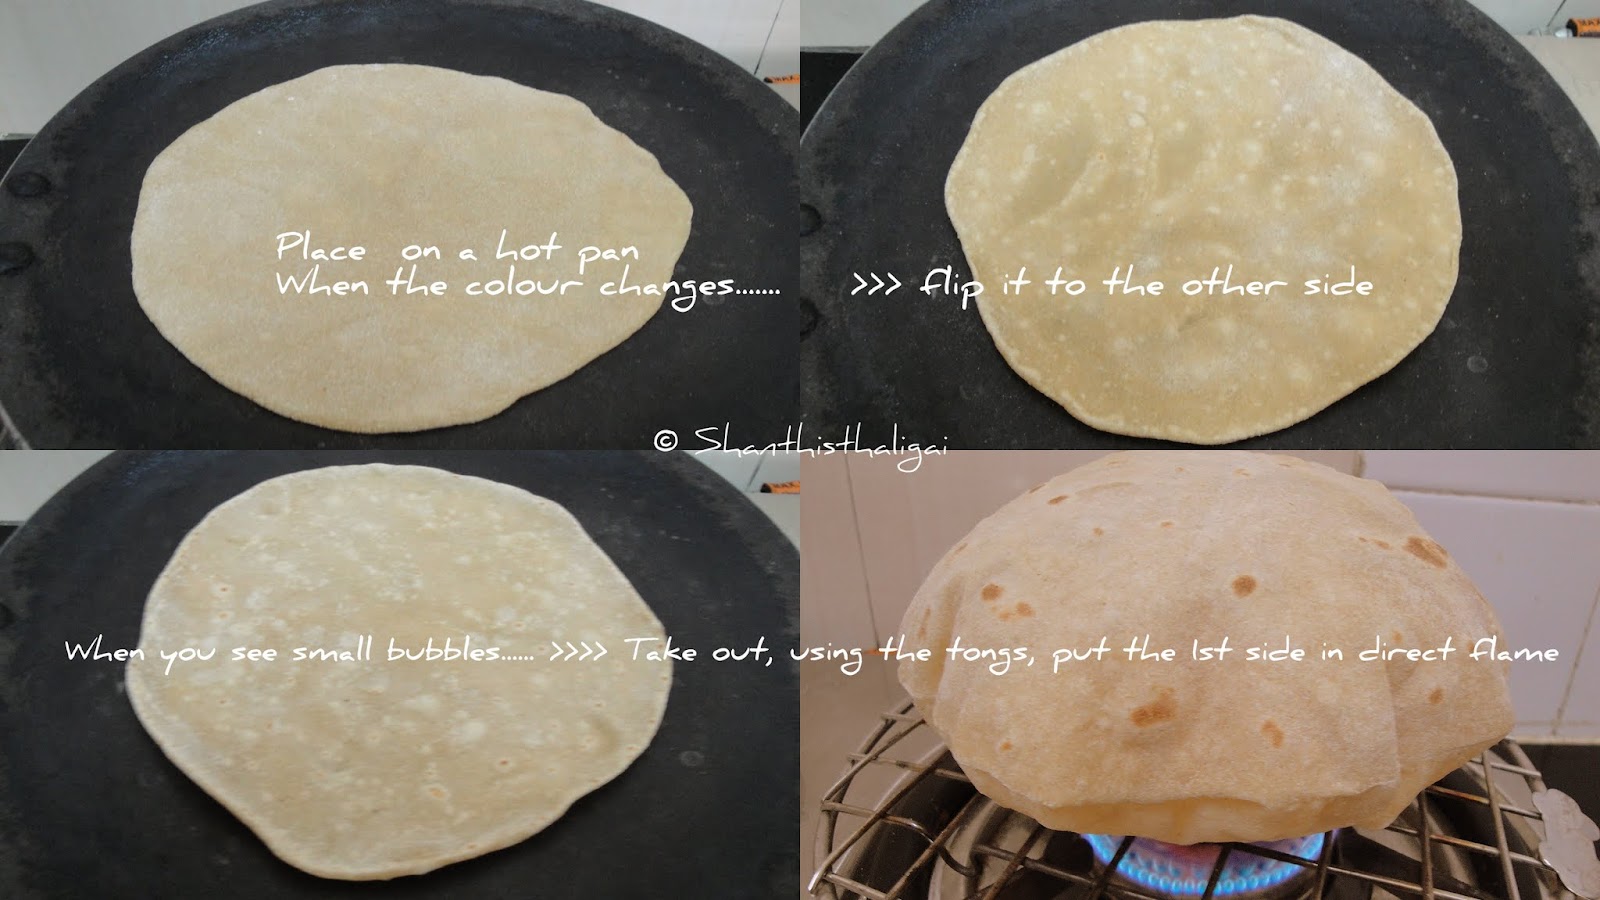
Make small balls out of the dough. Take a ball, dust it with a little flour(atta), and roll it out to a chapati. Meanwhile, heat a skillet and when hot, place the rolled chapathi on it. When the colour changes slightly, turn it to the other side. When you see small bubbles forming on this side , turn it again. Allow it to raise by pressing it gently with a clean towel. When cooked take it out from the skillet and brush it with ghee. Serve hot.

For phulkas: Heat a skillet and when hot, place the rolled chapathi on it. When the colour changes slightly, flip it to the other side. When you see small bubbles forming on this side, take out using the tongs and put the first side down on the roti grill which is placed on direct high flame OR you can put it directly on open flame using the tongs. It puffs up beautifully, no need to roast the other side, but you can if u wish to. 

Wednesday, May 20, 2015

DAHI PURI / DAHI POORI

DAHI PURI,DAHI POORI,DAHI PURI CHAT RECIPE,HOW TO MAKE DAHI PURI, HOW TO MAKE DAHI PURI CHAT

Dahi puri, a popular chat, is a healthy, cool and easy to prepare snack especially during summer. 

INGREDIENTS:

Mini puris - 20
Thick curd - 1 1/2 cups 
Potato - 1 Big (boiled and mashed)
Green chutney - 4 tablespoons
Sweet chutney - 2 tablespoons
Chat masala  - 1 tsp.
Red chilli powder - 1/2 tsp.
Salt  - to taste
Sev - 4 tablespoons
Coriander leaves (finely chopped) - 2 tablespoons

DAHI PURI,DAHI POORI,DAHI PURI CHAT RECIPE,HOW TO MAKE DAHI PURI, HOW TO MAKE DAHI PURI CHAT

METHOD:

Fry pooris.  Beat curd until smooth. A pinch of sugar/salt can be added to the curd if desired. 

Boil potatoes, peel, add little salt and mash roughly. 

Take a poori, crack a hole in the centre and stuff with the potato filling. Add green chutney, sweet chutney on top of it. Pour beaten curd  on it. Top it with sev and finely chopped coriander leaves. Sprinkle chat masala and red chilli powder. Serve immediately. 

Add more or less of any ingredients according to your tastebuds.

Wednesday, May 13, 2015

PANI PURI / GOLGAPPA / PANI POORI

PANI PURI,GOLGAPPA,PANI POORI,HOW TO MAKE PANIPURI, HOW TO MAKE GOLGAPPA


Pani puri, also called as golgappa and phuchka, is a popular street snack. Pani puris can be presented in one's own way with different ingredients. The filling can be of your choice, with any of these ingredients, boiled potatoes, boiled green gram dhal, sev, boiled chickpeas, onions etc. I do not use onion and garlic, and so this can be had even during vrat days. I personally prefer to have it with boiled and mashed potatoes alongwith sev or boondhi. 

NOTE WHILE FRYING PURIS:
1. Ensure oil is hot before frying. If oil is not hot, the puris will absorb oil and will not puff. 
2. Test the heat with one puri. If the oil is hot enough, the puri rises fast to the surface of the oil. 
3. While frying  keep the stove in medium flame.  If it is smoking hot, the puris will be burnt. 

I made the puris from store bought ready to fry papads which are available in departmental stores at coimbatore. However, I will post home made puris for panipuri in a separate post.

INGREDIENTS:

Pooris - 20

FOR TEEKHA PANI:
Green chutney - 5 tablespoons
Sweet chutney - 2 tablespoons
Chat masala  - 1 tablespoon
Lemon juice - 2 tablespoons
Black salt - 1/2 tsp.
Roasted cumin powder - 1/2 tsp.
Salt  - to taste
Ice water - 4 cups
Boondi - 4 tablespoons

FOR THE FILLING:
Potato - 3 medium sized
Chilli powder  - 1/4 tsp.
Chat masala - 1/4 tsp.
Salt  - to taste
Coriander leaves (finely chopped) - 2 tablespoons
Boondhi / Sev  -  as needed

PANI PURI,GOLGAPPA,PANI POORI,HOW TO MAKE PANIPURI, HOW TO MAKE GOLGAPPA

METHOD:

Fry pooris.

HOW TO PREPARE TEEKHA(SPICY) PANI?:
Mix all ingredients given under "for teekha pani". Add more or less of any ingredients according to your tastebuds. Finally, while serving, add boondhis.

HOW TO PREPARE THE STUFFING?
Boil potatoes, peel and mash roughly. Add all the ingredients given in "for the filling". Mix well. Keep aside.

HOW TO SERVE?
Take a poori, crack a hole in the centre and stuff with the potato filling, garnish with boondhi, dip and fill in with teekha pani and serve immediately.  If desired, add some green chutney and sweet chutney while stuffing.

PANI PURI,GOLGAPPA,PANI POORI,HOW TO MAKE PANIPURI, HOW TO MAKE GOLGAPPA

Tuesday, May 12, 2015

SWEET CHUTNEY / SWEET CHUTNEY FOR CHAAT

SWEET CHUTNEY, SWEET CHUTNEY FOR CHAAT, HOW TO MAKE SWEET CHUTNEY, HOW TO MAKE SWEET CHUTNEY FOR CHAAT

This is another chutney which is accompanied with samosas and chaat items. This is also served alongwith green chutney.

INGREDIENTS:

Seedless dates - 1 cup(tightly packed)
Tamarind - 1/4 cup (tightly packed)
Jaggery - 1 cup
Dry red chillies - 2
Cumin seeds - 1/2 tsp.
Black salt - 1/2 tsp.
Salt
Strainer

METHOD:

Soak dates, jaggery and tamarind in water for 1 hour. Mash well and boil for 5 minutes. Alternatively, add a cup of water and pressure cook for 2 whistles without soaking. Allow it to cool. 
Dry roast chillies and cumin seeds.

Grind all the ingredients in a mixie and strain using a strainer.

Can be stored in a fridge for a week.